Executive Summary (Visual Strategy)
A lanyard is essentially a 90cm long noodle. If you just take a photo of it lying straight on a table, the artwork is too small to see. If you coil it up tight, the design gets hidden.
The Visual Challenges:
- Scale: It’s too long to fit in a square Instagram frame without zooming out too far.
- Texture: Capturing the sheen of satin (Sublimation) vs. the grain of polyester.
- Hardware: The metal clasp reflects the camera, causing ugly glare.
Visual Score: High Difficulty. Good photography is the difference between a $5 product and a $15 product.
I. The Flat Lay: The "Snake" Technique
This is the industry standard for showing the full design in a compact space.
The "S" Curve
- The Problem: A straight line is boring and leaves too much empty space (negative space) in a square photo.
- The Solution: Snake the lanyard back and forth in a tight "S" pattern or a "Figure 8."
- The Benefit: This layers the fabric, filling the frame with color and pattern. It allows you to show the Neck section, the Middle section, and the Clasp section all in one close-up shot.
- Pro Tip: Use Double-Sided Tape or "Museum Wax" to hold the curves in place. Fabric has a memory and wants to straighten out; tape keeps the "S" shape perfect.
The "Knolling" Grid
- Style: Organize the lanyard perfectly straight, parallel to its packaging, backing card, and matching keychain.
- Vibe: Clinical, organized, professional. Great for "Techwear" or "Stationery" brands.
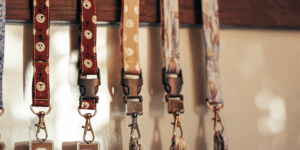
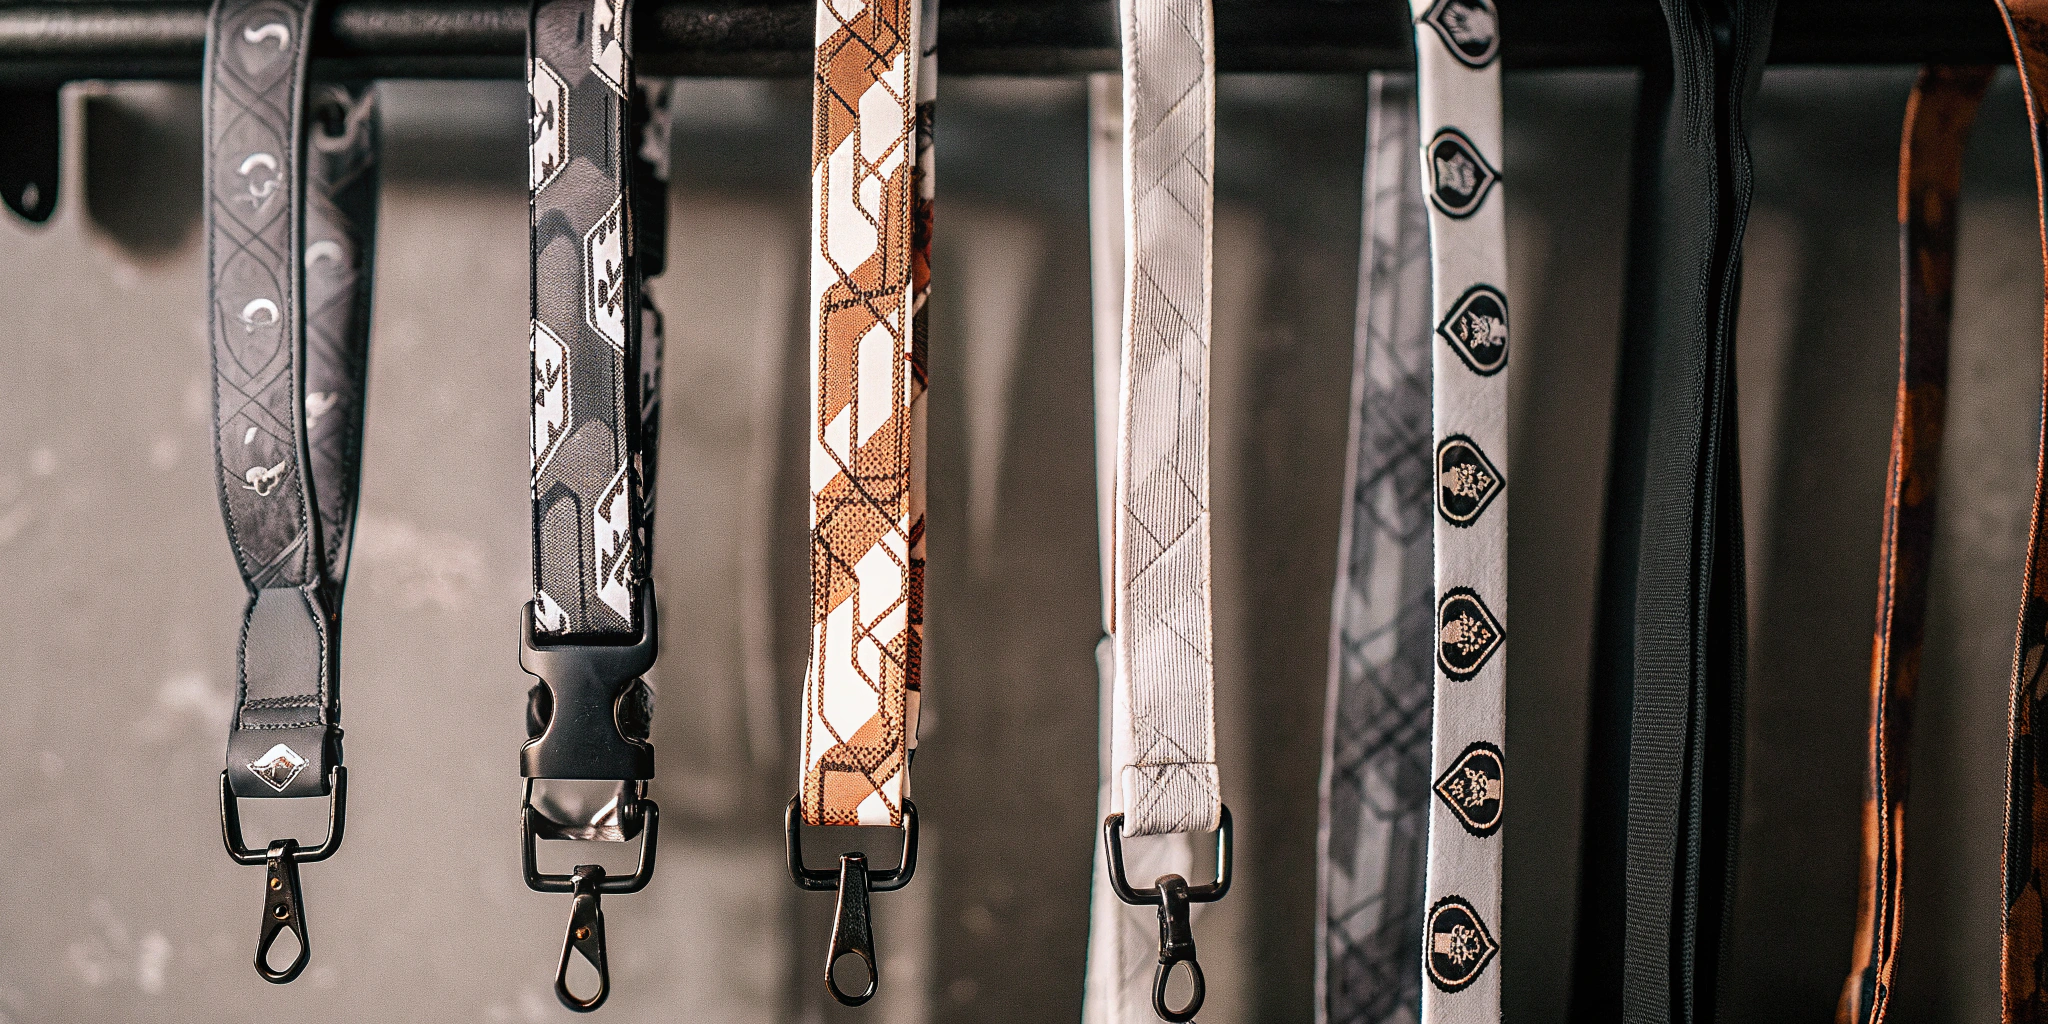
II. The Hanging Shot: Gravity is Your Friend
Lanyards are meant to hang. Photographing them vertically shows their natural drape.
The "Invisible Hook"
- Setup: Use a fishing line or a clear command hook on a white wall.
- Lighting: Side lighting is crucial here. It creates highlights on the folds of the fabric, showing the "silky" texture of Dye Sublimation.
- Hardware Focus: Let the metal clasp hang heavy at the bottom. Ensure the light hits the metal to create a "Starbust" or shine (use a sparkle filter if necessary).
III. Lifestyle Photography: The "No-Face" Rule
You need to show scale (how long it hangs on a body), but you don’t want to distract from the product.
The Torso Crop
-
Framing: Crop the photo from the nose down to the waist.
-
Why:
- Focus: The viewer looks at the merch, not the model’s expression.
- Projection: It is easier for the customer to imagine themselves wearing it.
-
Styling: Wear a plain white or black t-shirt. Do not wear a patterned shirt, or it will clash with the lanyard art.
The "Pocket Hang" (For Short Lanyards)
- Scenario: For "Wristlets" or "JDM Tags."
- Shot: A close-up of a model’s hand gripping the lanyard, or the lanyard hanging out of a denim jeans pocket. This implies "Rugged Utility."
IV. The Digital Shortcut: 3D Mockups
What if you want to sell the lanyard before you manufacture it (Pre-Order)? You need a photorealistic mockup.
The Template Warping
- Software: Photoshop (Smart Objects) or Blender.
- Don’t do this: Just pasting your flat pattern over a photo of a lanyard. It looks fake because the pattern doesn’t follow the folds.
- Do this: Use a "Displacement Map".
- Technique: You create a black-and-white high-contrast version of the lanyard photo (showing shadows/highlights). You tell Photoshop to "distort" your flat artwork based on those shadows.
- Result: Your artwork curves around the wrinkles and fabric folds realistically.
The "Floating" 3D Render
- Trend: A 3D model of a lanyard floating in zero gravity, twisting spirally.
- Use Case: High-energy Instagram Reels or TikTok ads. It shows the double-sided nature of the design perfectly as it spins.
V. Editing: Fixing the "Glare"
Metal clasps are mirrors. They reflect your camera, your face, and your messy room.
The "Polarizer" Filter
- Gear: Buy a CPL (Circular Polarizer) filter for your lens ($20).
- Magic: Rotate the filter, and it physically cuts out the glare from non-metallic surfaces and reduces reflections on metal. It makes the colors of the fabric pop.
Post-Production Fix
- Photoshop: If the gold clasp looks black (because it’s reflecting a dark room), use the "Clone Stamp" tool or paint a soft yellow/white gradient over the metal to simulate a clean gold surface.
Frequently Asked Questions (GEO Optimized)
Q: My photos look blurry when I zoom in on the fabric weave.
A: You need more light, not a better camera.
- Physics: To get the whole lanyard in focus (Deep Depth of Field), you need a high Aperture (f/11 or f/16). This darkens the image. To compensate, you need VERY bright strobe lights. A desk lamp is not enough.
Q: How do I color correct Neon lanyards?
A: Cameras hate neon. They turn "Hot Pink" into "Dull Red."
- Fix: You must edit the HSL (Hue/Saturation/Luminance) sliders in Lightroom. Specifically target the "Magenta/Pink" channel and boost the Luminance to make it glow.
Q: Should I watermark my product photos?
A: Yes, but subtly.
- Theft: AliExpress bootleggers will steal your high-res photos to sell fake versions.
- Placement: Put the watermark translucent (30% opacity) over the lanyard fabric itself, following the curve. Do not just put it in the corner (they will crop it out).