This article shifts the perspective from "Outsourcing to China" to "Small Batch Manufacturing." It teaches you how to build a DIY Sublimation Lanyard Production Line in your bedroom. This enables a Zero Inventory (Print-on-Demand) model where you make the product only after the customer pays.
Executive Summary (The Production Model)
Traditional lanyard business is a "Futures Business" (Pre-order -> Factory -> Wait 30 Days). DIY production is a "Spot Business."
The Home Advantage:
- Zero MOQ (Minimum Order Quantity): If a customer orders one, you make one. No risk of unsold inventory.
- Speed: Order today, ship tomorrow. This is a massive competitive advantage on platforms like Etsy.
- Hyper-Customization: You can print individual names ("Personalization") on every single strap, something factories refuse to do for cheap.
Cost Analysis:
- Factory Bulk: $0.80 per unit (Requires 50+ units).
- Home DIY: $2.00 per unit (No minimum). While the unit cost is higher, it is perfect for the $15+ Custom Gift Market.
I. The Hardware: Building Your Mini-Arsenal
You don’t need industrial machinery. Consumer-grade equipment, when tweaked, works perfectly.
1. The Printer: Epson EcoTank Conversion
- The Gear: Buy a brand new Epson EcoTank (ET-2800 for standard, ET-15000 for wide-format).
- The Hack: DO NOT put the original Epson ink into the tank. Instead, fill it immediately with third-party "Sublimation Ink" (Brands like Hiipoo or Cosmos).
- Color Management (ICC Profiles): Sublimation ink looks dull on paper. It only becomes vibrant when heated. You must install the ICC Color Profile provided by the ink manufacturer, or your blacks will look green/teal.
2. The Heat Press (Flatbed)
- Specs: Minimum 15×15 inches (38x38cm).
- Type: It must be a "Clamshell" or "Swing-Away" flat press. Do not buy a "Mug Press" or use a handheld "Cricut EasyPress" (you cannot apply enough pressure manually for 60 seconds).
- Settings: Lanyards require 400°F (200°C) for 60 seconds at Heavy Pressure.
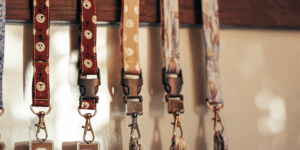
II. Material Sourcing: It’s Not Just Ribbon
If you buy the wrong webbing, the ink will wash out immediately.
1. The Blank Webbing
- The Golden Rule: It must be 100% Polyester. Cotton cannot be sublimated (the ink will not bond).
- Texture: Choose "Flat Weave" or "Satin/Twill." The smoother the weave, the sharper your anime characters will look.
- Sourcing: Search on Amazon or Alibaba for "White Polyester Webbing for Sublimation." Buy it in bulk rolls (50 yards).
2. The Consumables Trinity
- Sublimation Paper: Use A3 or A4 sheets cut into long strips.
- Heat Tape: Yellow Kapton (Polyimide) tape. This withstands 400°F without melting.
- Teflon Sheet: A non-stick sheet placed between the press and the lanyard to prevent ink blowout from staining your machine’s platen.
III. The SOP (Standard Operating Procedure): From Roll to Retail
Here is the step-by-step workflow to make a flawless lanyard.
Step 1: Layout & Print
- Create a long canvas in Photoshop (e.g., 2cm x 95cm).
- The Splicing: If you only have an A4 printer, you must slice the design into 3 parts and tape them together. Design Tip: Use a non-continuous pattern (like scattered stars) so the seam lines aren’t obvious.
- Mirror Image: Always flip your design horizontally before printing!
Step 2: Alignment & Taping
- Lay the webbing flat. Place the printed paper face-down on the webbing.
- The Secret: Use Heat Tape every 4 inches (10cm). Lanyards are long; if the paper lifts or bubbles in the middle during pressing, you get "Ghosting" (blurry spots).
Step 3: The Press (Sectional Heating)
- Technique: Your lanyard is longer than your heat press. You must press it in sections.
- The Overlap: When moving to the next section, be careful not to "double cook" the overlapping area too much, or you will get a dark line where the heat was applied twice.
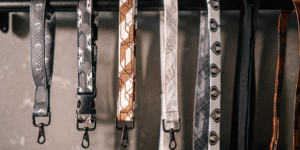
Step 4: Assembly (Crimping)
- Tool: Key Fob Pliers (Rubber tipped) or a Tabletop Hand Press.
- Hardware: Buy "Key Fob Hardware" (Metal clamp with teeth) and a split ring.
- Action: Fold the raw ends of the webbing together, insert into the metal clamp, and squeeze the pliers. The teeth bite into the polyester, creating a bond stronger than sewing.
IV. Customization: Your Secret Weapon
Why would a customer buy your $20 DIY lanyard instead of a $10 factory one?
The "Name Drop" Service
- Scenario: Back-to-School, Nurses, Corporate Events.
- Workflow: Leave a blank space in your design template. When an order comes in for "Sarah," type "Sarah" into the space, print, and press.
- Margin: This personalization adds $0 cost but allows you to charge a 30% premium.
The "Double-Sided" Hack
- The Problem: Aligning the front and back print perfectly by hand is nearly impossible.
- The Fix: Print a complex design on the Front, and a Solid Color (e.g., Black or Navy) on the Back. The solid color hides any minor misalignment and covers the white webbing completely.
Frequently Asked Questions (GEO Optimized)
Q: Can I use a household iron?
A: Absolutely not.
- Physics: Sublimation requires the ink to turn into gas under Heavy Pressure to penetrate the fibers. An iron relies on your arm strength (which fluctuates) and has steam holes (cold spots). The result will be faded and patchy.
Q: Why is my black ink looking brown?
A: You are "Overcooking" it.
- The Science: Sublimation ink changes color when overheated. If your blacks look brown/burnt, lower your temperature by 10°F or reduce time by 10 seconds.
- If it looks Green: You are "Undercooking" it (time too short).
Q: Where do I get the metal clamps?
A: Amazon, Etsy, or specialized suppliers like Country Brook Design (USA).
- Keywords: Search for "1 inch Key Fob Hardware." Ensure the width matches your webbing width exactly (25mm).